Use Camunda as an easy-to-use REST-based orchestration and workflow engine (without touching Java)
Use Camunda as an easy-to-use REST-based orchestration and workflow engine (without touching Java)
I talk a lot about microservice architectures with “non-Java-folks”, let it be a C# developer, a Node.JS/JavaScript nerd or GoLang enthusiasts. All face the problem that they need an orchestration engine in their microservice architecture — or simply want to leverage workflow, ordering of activities, handling of timeouts, Saga and compensation, or other cool features.
The Open Source BPM platform from Camunda serves these use cases very well. Developer friendliness is one of the key values behind the product — but as soon as you dive into the documentation you might get the impression that it is mostly Java specific developer friendliness. The platform provides tons of hooks to plug in your own functionalities and extensions but all this is done in Java. So are other techies locked out?
No! Actually it is easy to run Camunda without any Java knowledge and set up an architecture to code in the language of your choice. This blog post
- introduces the basic architecture,
- introduces the REST API,
- gives hints on existing client libraries for languages other than Java,
- shows an example using C# and Node.JS
- describes ways to run a Camunda server (Docker or Tomcat).
Architecture
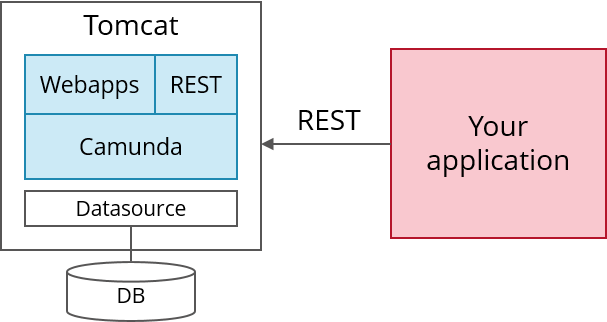
Camunda is written in Java and needs a Java Virtual Machine (JVM) to run. Camunda provides a REST API which allows you to code in whatever language you like and just talk REST with Camunda:
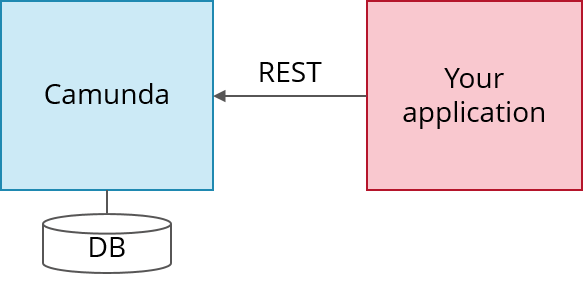
Workflows in Camunda are defined in BPMN which is basically an XML file. It can be graphically modeled using the Camunda Modeler.
Run Camunda via prebuilt Docker image
The easiest way to run Camunda is using Docker. Alternative ways of running Camunda are described later in this article.
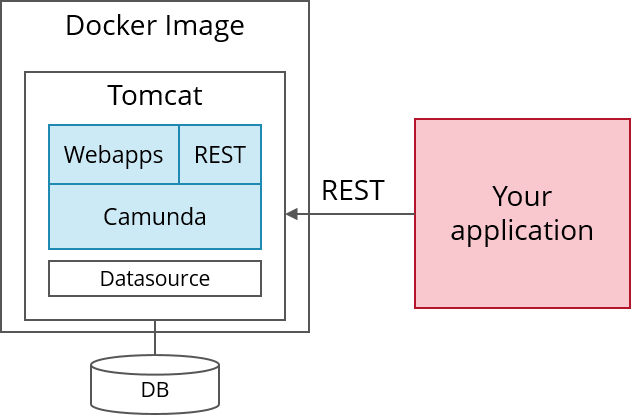
In the simplest case just run:
docker run -d -p 8080:8080 camunda/camunda-bpm-platform:latestYou do not have to care about Linux, Java Virtual Machines or Tomcats. The Dockerfiles and some documentation (e.g. how to connect that with the databases of your choice) is available on Github:
camunda/docker-camunda-bpm-platform docker-camunda-bpm-platform — Docker images for the camunda BPM platformgithub.comIf you want to run Camunda Enterprise Edition you can easily change the Dockerfile to use an enterprise download (https://github.com/camunda/docker-camunda-bpm-platform/blob/master/Dockerfile#L26).
There is one downside of this approach though: You get a tomcat version distributed by Camunda which might not always include the latest patches. So you can also build the docker image yourself basing on a proper Tomcat distribution like shown in this example. Or you follow one of the alternatives described later.
Deploy a process model
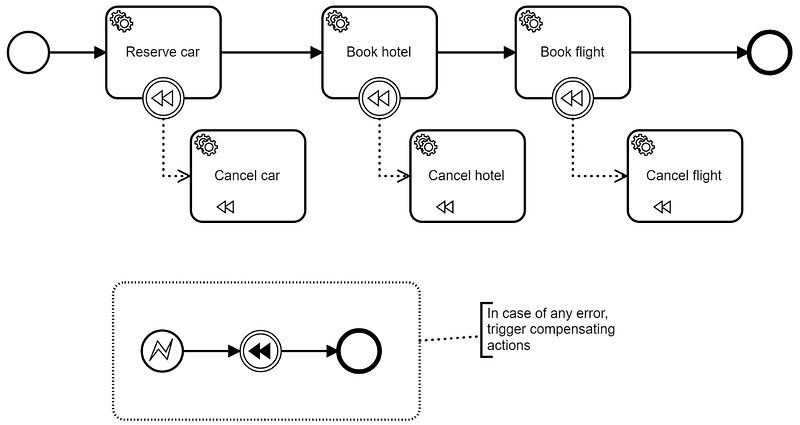
Let’s look at an example using the classical trip booking Saga where you want to call three activities in a row — and properly compensate successfully executed activities in case of a later failure. Expressed as BPMN it looks like the following:
Now you can leverage the REST API to deploy the process model. Assume you saved it with the name trip.bpmn *and started Camunda via Docker to have it available on *localhost:8080:
curl -w “\n”
-H “Accept: application/json”
-F “deployment-name=trip”
-F “enable-duplicate-filtering=true”
-F “deploy-changed-only=true”
-F “trip.bpmn=@trip.bpmn”
http://localhost:8080/engine-rest/deployment/createNow you can start new workflow instances via REST API and hand over data you want to have as workflow instance variables:
curl
-H “Content-Type: application/json”
-X POST
-d ‘{“variables”:{“someData” : {“value” : “someValue”, “type”: “String”}},”businessKey” : “12345”}}’
http://localhost:8080/engine-rest/process-definition/key/FlowingTripBookingSaga/**start**Now, the next interesting question is: How does Camunda call services like the car reservation? Camunda can not only call services right away (Push-Principle) using some built-in connectors, but also put work items into a kind of built-in queue. Then a worker can fetch work items via REST, do the work and let Camunda know of the completion (Pull-Principle).
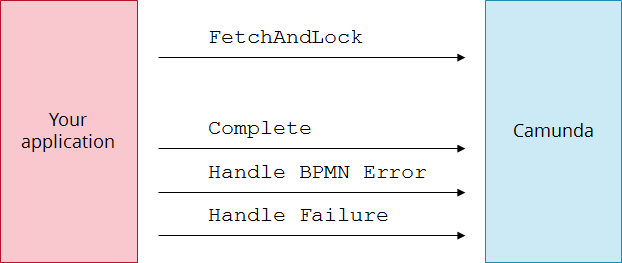
So first you fetch tasks and lock them for you (as other workers might fetch at the same time to scale your system):
curl
-H “Content-Type: application/json”
-X POST
-d ‘{“workerId”:”worker123”,”maxTasks”:1,”usePriority”:true,”topics”:[{“topicName”: “reserve-car”, “lockDuration”: 10000, “variables”: [“someData”]}]}’
http://localhost:8080/engine-rest/**external-task/fetchAndLock**And tell Camunda the worker has completed its work (note that you have to enter the external task id you retrieved in the first request):
curl
-H “Content-Type: application/json”
-X POST
-d ‘{“workerId”:”worker123”, “variables”: {}}’
http://localhost:8080/engine-rest/external-task/EXTERNAL_TASK_ID/**complete**See External Tasks allows new Use Cases with Camunda BPM or External Tasks in the docs for more information. You might also want to take a minute to read about why it is important to think about idempotency when using Camunda via REST.
That’s it —you did not touch any Java so far —right? And we already tackled enough to get started!
Client Libraries
Calling REST API is easy from any language. In JavaScript you simply use JQuery *and in C# you might leverage *System.Net.Http and Newtonsoft.Json to do so. But it might get verbose. So you might want to hide the REST details behind some client library.
At the moment there are a couple of pre-built client libraries available:
- JavaScript: https://github.com/camunda/camunda-external-task-client-js. This is supported by Camunda itself.
- Java: https://github.com/camunda/camunda-external-task-client-java. This is supported by Camunda itself.
- C#: https://github.com/berndruecker/camunda-dot-net-showcase and https://github.com/salajlan/camundacsharpclient. Both initiatives are in an intermediate state and rather inactive but can serve as a good starting point.
- PHP: http://camunda.github.io/camunda-bpm-php-sdk/ — don’t expect it too be complete or catch up with latest API changes, but I know projects using it.
Except JavaScript and Java the client libraries are not part of the Camunda product itself. Don’t expect them to cover the full Camunda REST API so if the library doesn’t provide a certain feature it does not mean it is not there, always check the Camunda REST API. Typical projects use the libraries as a starting point and copy & paste template.
Example with C#
Using the client library above we can simply write:
The fully working source code can be found online: https://github.com/flowing/flowing-trip-booking-saga-c-sharp. Another example is available on https://github.com/berndruecker/camunda-dot-net-showcase.
Example with Node.js
More details can be found on https://github.com/nikku/camunda-worker-node
Alternative ways to run Camunda
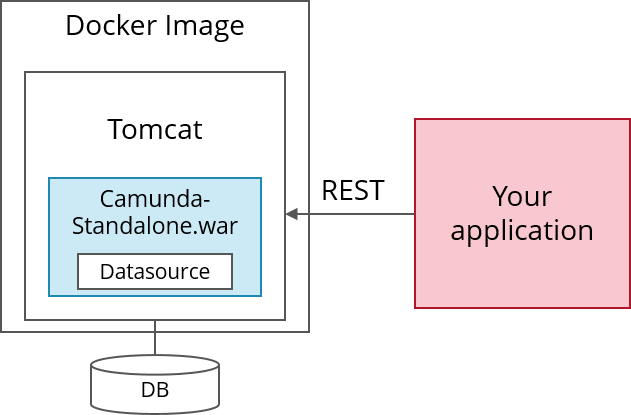
Custom Docker image with “Camunda standalone WAR”
As an alternative to the pre-built Docker image from Camunda you could also prepare Tomcat yourself (e.g. based on official Tomcat docker images) and then copy Camunda as one so-called war file into it. Here you find an example doing so as a Dockerfile.
If you have extensive additional requirements and are capable of setting up a Java build environment, you can even customize this Camunda standalone war. Therefore setup a Maven build like in these example: Maven build reconfiguring the war or Maven build with Overlay.
Run Camunda Tomcat distribution
The other alternative is to simply download the Camunda Tomcat distribution, unzip it — and run it. It only requires a Java Runtime Enviromnent (JRE) on your machine which you can easily install from here.
If you now want to change database or the-like, you need to configure Tomcat as described in the docs. I know that Tomcat might give you a hard time, but it is actually very straightforward to get going. And Google knows everything you may need to ask :-)
Run Camunda on Tomcat
The last alternative is to setup Tomcat yourself and install Camunda into it, following the installation description. This gives you the freedom to use whatever Tomcat version you prefer or e.g. install it as a Windows service.
Running Camunda in production
Typically you need to conduct some final configurations to run Camunda. There are best practices from Camunda showing this in great detail but I will skip it in this introductory post and just name an example: The REST API of the default distribution is not configured to require authentication. You might want to change this.
Summary
As you saw it is very easy to get started with Camunda independent of the language you are fluent in. The key is that all communication is done via REST API. Installation is rather straight forward, especially when using Docker.
As always, I love getting your feedback. Comment below or send me an email.
Stay up to date with my **newsletter*.*